Heavy Equipment 4 min read

Skid-Steer vs. Compact Track Loader: Which Fits Your Work?

Compare ground conditions, attachments, machine specifications and ownership questions before choosing wheels or tracks.
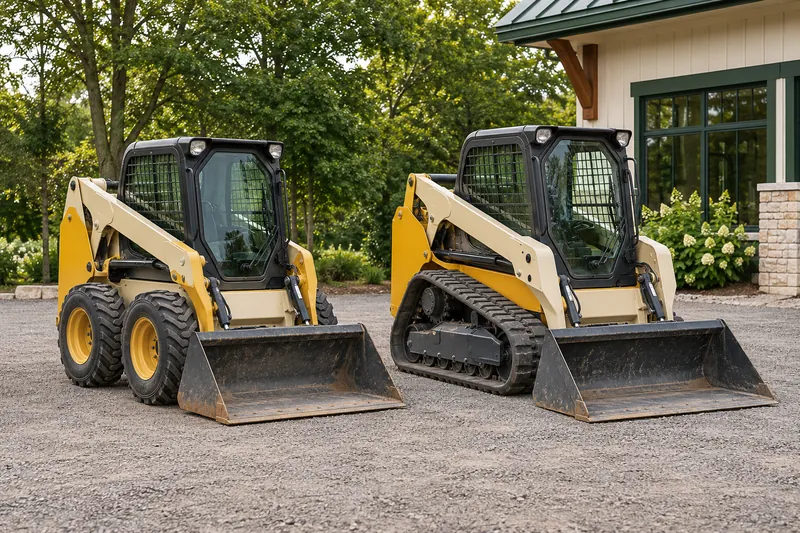
An illustrative wheeled skid-steer beside a compact track loader, parked with both buckets lowered.
Illustrative image

A skid-steer loader uses wheels; a compact track loader uses tracks. That visible difference matters, but it is only the beginning of the buying decision. Use your work, ground conditions and attachment requirements to build a shortlist, then compare the exact machines offered for sale.

Before you begin

Choose a machine for the jobs and surfaces you work on most. Verify the model’s specifications and attachment compatibility rather than assuming every loader in a category behaves alike.

Describe the surface, including the difficult days

Wheeled skid-steers are commonly considered for firm surfaces. Compact track loaders offer flotation and traction benefits on softer ground. Bobcat’s comparison places ground conditions at the center of this choice. Tell the dealer what your site is like when conditions are less convenient, not only on a dry viewing day.

Write down where the machine would spend most of its working time. Include travel between work areas and the surfaces you need to protect. Ask a specialist to assess any challenging terrain. Tracks are not a promise of safe operation on every slope or surface.

Further reading: Bobcat (opens in a new tab)

Start the specification check with your tools

Make a list of the attachments you intend to use, with their exact model numbers. Ask the dealer to confirm the mounting system, hydraulic requirements and any control connections for each pairing. A loader being described as ‘high-flow’ does not establish compatibility with every powered attachment.

Bobcat’s hydraulic guidance distinguishes flow and pressure options and notes model-dependent connections. Record which options are installed on the used machine, not just what was available when that model was new. Ask for documentation when an attachment or system has been changed.

  • Identify the attachment models and their required connections.
  • Confirm the loader’s installed hydraulic and control options.
  • Keep included tools separate from optional extras in the offer.

Further reading: Bobcat (opens in a new tab)

Compare the numbers that apply to your work

Use the manufacturer’s information for the exact model and configuration. Review rated operating capacity, operating weight, dimensions and hydraulic specifications with the dealer. A tipping-load figure is not interchangeable with rated operating capacity. Ask how the quoted limits apply to your planned attachment and task.

Record site access and loading requirements separately. For transport, get a quote or assessment using the complete machine and equipment you plan to move. Do not infer a suitable transport setup from a listing photograph or the fact that another owner used a similar trailer.

Further reading: Bobcat (opens in a new tab)

Look at condition after choosing the type

Once you know which type fits your brief, evaluate the actual listing. Ask for service records, displayed hours, attachment details and known faults. Arrange an independent equipment inspection. Have the technician explain the condition of the tires or track system as well as the rest of the machine.

Ask for priced recommendations rather than a vague statement that wear is ‘normal.’ Keep planned maintenance separate from unresolved faults. The right type of loader can still be the wrong individual purchase if its condition, records or support do not fit your needs.

Further reading: Caterpillar (opens in a new tab)

Test the decision against a normal working week

Imagine the tasks, locations and attachments in a typical week. Ask where each candidate would make the work easier and where it would introduce a compromise. For uncertain applications, discuss a supervised demonstration or rental with an equipment professional before committing.

Summarize each candidate on one page: fit for the job, confirmed specifications, inspection findings, included tools and unresolved questions. Add the delivery and service arrangements you have actually discussed. This makes the next conversation with a seller focused and much easier to compare.

A little help to take along

Your wheels-or-tracks shortlist

Check off what you have covered. Keep your open questions for the next conversation.

Your wheels-or-tracks shortlist

Checking every item records your progress; it does not certify a vehicle or a seller.

Common questions

Is a compact track loader always better than a skid-steer?

Neither type is automatically the best fit for every job. Ground conditions, required attachments, access and the exact model all matter. Start with your regular work and compare documented specifications, then inspect the individual machines on your shortlist.

Will the same attachment work on both types?

It may, but the machine type alone does not confirm compatibility. Check the exact attachment and loader combination, including the mount, hydraulic requirements, electrical controls and the manufacturer’s restrictions.

Should I compare rated capacity or tipping load?

Use the manufacturer’s rated operating capacity and the applicable limits for the model, configuration and attachment. Tipping load is a different figure. Have a knowledgeable dealer explain which numbers apply to your intended work.

Keep learning

Useful reading from the organizations referenced in this guide.

Your next chapter

Find a loader that fits the way you work.

Explore Heavy Equipment What identity verification means
A little help before you post

Selling tips

A thoughtful listing starts with clear photos. Take a few useful tips into your next post.

An illustrative seller using a phone held horizontally to photograph a green pickup truck.
Illustrative image

4 min read · Selling tips

How to Photograph Your Vehicle for a Better Listing

Good listing photos answer questions. What does the whole vehicle look like? What is the interior like? Where is the wear? You can build a useful set with a phone, a tidy location and a few deliberate choices before you start.

01

Give the vehicle room to be seen

Choose a quiet place where you are allowed to park and photograph safely. Leave enough room to walk around the vehicle without entering traffic. Clear loose items from the cabin and cargo area, and move anything with personal information out of view.

Check what appears behind and through the vehicle: signs, house numbers, paperwork and reflections can all end up in a photo. Clean the camera lens and take one test image. Zoom in on it to check sharpness before you spend time photographing the whole vehicle.

  • Use current photos of the vehicle you are selling.
  • Park safely, switch off the engine and keep the vehicle stationary.
  • Remove clutter without concealing damage or signs of wear.
02

Choose simple light and natural proportions

Soft daylight is a useful starting point. Nissan’s photography guide recommends cloudy conditions or the softer light around morning and evening to avoid harsh contrast. Walk around the vehicle and check whether shadows hide the areas a buyer needs to see.

Start with the phone’s standard camera rather than an ultra-wide view, which can distort the shape. Step back to fit the whole vehicle into the frame. Keep the phone level and leave a little room around the edges so the photo still works when displayed as a smaller card.

03

Build a set that tells the whole story

Begin with a clear front three-quarter view: the front and one side in the same photo. Then work methodically around the outside. For the interior, show the driver’s area, seats and usable storage. Let each photograph answer a different question instead of uploading several nearly identical angles.

Include the odometer and relevant controls, with the vehicle safely stationary. For a boat or RV, adapt the sequence to show the layout and equipment. Keep any documents containing names, addresses or other personal information out of the image.

  • Front three-quarter view, then the other side and rear.
  • Both side profiles and any important exterior features.
  • Driver’s area, front and rear seating, and storage space.
  • Wheels, useful equipment and close-ups of condition.
04

Make condition easy to understand

For a scratch or dent, take one wider image showing where it is and a second closer image showing the detail. Use the description to explain what the photo depicts. The wider view prevents a close-up from becoming a puzzle.

Keep color and brightness realistic. Cropping and modest exposure adjustments can make a photograph easier to read, but do not remove damage, replace parts or use generated images to represent the item for sale. If a photo is too dark to show the detail, retake it in better light.

  • Show wear that a buyer would notice during a viewing.
  • Match the written description to the photos.
  • Replace blurry images instead of relying on heavy editing.
05

Review the listing like a buyer

Choose a primary photo that shows the actual vehicle clearly at a small size. Preview the full set on your phone: can you follow the walkaround, understand the interior and find the condition details? Remove duplicate shots that do not add information.

Ask someone unfamiliar with the vehicle to look through the images and tell you what is still unclear. Add those missing views before publishing. If the vehicle’s condition or included equipment changes, update both the photographs and the description so the listing remains an accurate introduction.

Your next photo session, planned.

Photo plan: one clear cover image, a complete exterior walkaround, the seating and storage, the important equipment, and honest close-ups of wear. Check every image on a phone before publishing.

Your listing photo checklist

  • Choose a safe, uncluttered place with suitable light.
  • Clean the lens and check a test photo for sharpness.
  • Take a clear primary image with the whole vehicle visible.
  • Photograph each side, the front and the rear.
  • Show the seating, controls, storage and fitted equipment.
  • Include wider and closer views of damage or wear.
  • Check for private information and distracting reflections.
  • Remove duplicates and review the final order on your phone.

Further reading: Nissan — How to: Car Photo Tips (opens in a new tab)

Open the guide & interactive checklist

Sign in or create an account

Ask about this vehicle

Preparing your conversation…

Verify your identity

1 Document2 Selfie3 Review

A little confidence goes a long way

Use a valid government-issued identity card or driver’s license. Include all four corners and make sure the details are readable.

JPG, JPEG, PNG, WebP or AVIF · Up to 5 MB each. Your documents are only visible to our review team.

Report conversation

Conversation about

Help our team understand what happened. Choose the reason that fits best.

Report details
Why are you reporting this conversation?

Conversation feedback

Respond to feedback

Your response appears publicly below this review.

Delete conversation?

This removes the conversation from your inbox. The other person keeps their copy. If a new message arrives, the conversation will appear again.

Delete listing?

This permanently deletes the listing, its photos, videos and associated conversations. It also removes saved copies from buyers’ lists. This cannot be undone.

You have unsaved changes

Keep editing to finish your changes, or leave this page.

Share this find

Seller identity verified

A verified identity behind the listing

This badge means our team has reviewed this seller’s identity and marked it as verified.

Identity verification applies to the seller. It does not certify the vehicle’s condition, ownership or a transaction.

Identity verification explained

Shop by category

What are you looking for?

Browse all vehicles